}

Saturday, November 28, 2015

Today and Always

It has been a few days since I have posted - I have had a influx of magazine commissions (always exciting) and some special posts that will be happening next month - I love this time of the year for that - they may involve the word - giveaways - so keep watching this space!!


There is something to be said for simplicity...it is not always something that comes easy to me, but I am learning to appreciate it and love to challenge myself to have a try. I have to admit I have gone with the patterned paper from Websters Pages and was inspired by the adorable little butterfly on the lower right edge,  The card base has been cut using Spellbinders 5 x 7 Matting Basics A and the Platinum Die Cutting & Embossing Machine.


I have stamped and coloured two butterfly's from the Penny Black Inc. Social Butterfly set, added some shimmer and Want2Scrap bling to the body and leaves, along with a beautiful bling border across the top.  As always my card is held together by Scrapbook Adhesives by 3L E-Z Adhesive Runner and 3D Foam Squares used for dimension under the wings - just the perfect amount of height.


A sentiment from SRM Stickers is the perfect finishing touch - not too little and not too much - don't you think!?

This card is linked to the following challenges:
Crafting-With-Friends Always Anything Goes
PDE Linky Party - Anything Goes
Craft rocket Challenge - Add a Sentiment
Quick Quotes - Things With Wings
Aud Sentiments Challenge - Anything Goes + A Sentiment 
Crafty Girls Creations Always Anything Goes
Crafty Gals Corner - Anything Goes
Creative Moments - Always Anything Goes
Inspiration Destination - Always Anything Goes
 Simon Says Stamp -  Anything Goes
WordArt Wednesdays - Anything Goes
2 Creative Chicks - Anything Goes
Crafty Hazelnut's Patterned Paper - Anything goes with Patterned Paper
Just Keep On Crafting - Anything Goes

Thank you for your comments and all of the support you give me - you make blogging such an amazing place to be!! Your encouragement is such a blessing for me - it makes my day! God bless you!

{{{Hugs}}}

Tuesday, November 24, 2015

Enjoy the Journey - Spellbinders Retreat

Hello Blog Friends - I am excited to share the first of what I hope to be 'many' layouts from the 2014 Spellbinders Retreat - it was the most amazing and life changing time - one of those moments where you realise you are 'living your dream!'   I hope I can capture some of the 'magic' that we all got to experience.


 We were treated by a whole day in Sedona by Stacey Caron - not only is she an amazing lady, her love for her designers is second to none - it was wonderful - what an extravaganza for the eyes - such a beautiful place.    


We made a few stops along the way and each of those will be the focus of more layouts - hopefully they will not take a year! LOL!  I have used patterned paper from My Mind's Eye, along with embellishments from     


One of the highlights of the day trip was lunch at the Enchantment Resort Restaurant that was down at the very bottom of Sedona - the views were breathtaking and the food divine - so much to choose from - on the waiters recommendation I had Grits and Shrimp Gumbo - divine!  Much to my surprise some of the Americans there had not tried Grits  can you believe that!?!  A little like polenta but very creamy.


The International Ambassadors and the Design Team are an exceptionally talented group of designers/artists with syles from CAS to Mixed Media and everything in between - so much inspiration in one place is an amazing experience!
    

The Prickly Pair Spellbinders® Shapeabilities®  is perfect for this layout - those little lizards are the cutest things and have been cut using the   Platinum Die Cutting and Embossing Machine.  I have also used Scrapbook Adhesives by 3L Crafty Foam Tape and E-Z Adhesive Runner.


No journaling on this layout - the paper and the embellishments do that for me - I love it when that happens! Corrugated cardboard has added texture and dimension - a bit rustic - perfect for the feel of the layout.  I have created a stencil using the Grate Effect Spellbinders® Nestabilities® Card Creator and texture paste for some dimension, 


I hope you have enjoyed the layout - I have to say - the photo does not do it justice at all, but I am sure you get the idea!

This layout is liked to the following challenges:
Love to Scrap - Anything Goes
Love To Scrap Challenge - Anything Goes
Not Just Cards - Always Anything Goes
Karleigh Sue Challenge - One for the Girls
The Crazy Challenge - Everything Goes
We Love 2 Create  - Anything Creative/ Mixed Media Goes 
Scrappers Delights - Always Anything Goes 
Brown Sugar – Anything Goes
Simply Papercraft - Always Anything Goes
Aud Sentiments Challenge Anything Goes + A Sentiment 

You can see more photos of the Retreat in my facebook Album HERE if you missed them at the time or would just like to check out what we were up too - but just know that what happened in Phoenix - stays in Phoenix!! LOL!

Thank you for your comments and all of the support you give me - you make blogging such an amazing place to be!! Your encouragement is such a blessing for me - it makes my day! God bless you!
{{{Hugs}}} and happy creating!

Sunday, November 22, 2015

Simply Wonderful

Hello Blog friends - it is Sunday evening for me and I have enjoyed time in The Studio today working on some tutorials and magazine commissions - but could not resist creating a quick and easy card.


I have sprayed white cardstock usinImagine Crafts 'featuring' Tsukineko
 Fireworks Spray in Dandelion, Pear Tart and Angel Pink - allow this to dry thoroughly - check out the shimmer - divine!!

The Simply Wonderful Spellbinders® Shapeabilities® Decorative Card Front has an outer 
rectangular border die along with the inset. This has been cut using the Platinum Die Cutting and Embossing Machine.  Black cardstock has been cut to size and popped behind the word wonderful and secured usingScrapbook Adhesives by 3L E-Z Adhesive Runner. This has then been adhered to the sprayed cardstock and popped up into white cardstock, but lightly larger, using Scrapbook Adhesives by 3L 3D Foam Squares.


This card is liked to the following challenges:
Aud Sentiments Challenge Anything Goes + A Sentiment 
Stempelsonne Challenge - Anything Goes
Crafty Girls Creations - Always Anything Goes
Creative Fingers Challenge - Anything Goes
Jilia Spiri Challenge - Add A Sentiment
Brown Sugar Challenge - Anything Goes
Mod Squad Challenge - Pattern Your Paper
Art By Miran Challenge - Anything Goes

Thank you for your comments and all of the support you give me - you make blogging such an amazing place to be!! Your encouragement is such a blessing for me - it makes my day! God bless you!
{{{Hugs}}} and happy creating!

Saturday, November 21, 2015

Spellbinders Lacey Layers Tutorial

Hello everyone -I am sharing a Spellbinders Step by Step Tutorial today - I am wanting to show you just know easy it is to create lacy layers using the gorgeous filigree dies and having an elegant and professional looking card.


One of the things I love about Spellbinders Dies is the way the dies work so well together creating unique and timeless cards.

Spellbinders Products:
Preferred Partner Products:


1. Cut.emboss one (1) Lacey Oval using Whirl White
2. Cut/emboss stamped and coloured image using Classic Oval # 5 (#1 being the smallest)
3. Pop oval onto Lacey Oval using 3D Foam Squares
4. Adhere double to the top of the Classic Oval using liquid glue

5. Cut/emboss one (1) A2 Tranquil Moments using Whirl White, 
6. Remove the extra pieces using the Tool'n One
7.Adhere the A2 Tranquil Moments to a precut card base in green
8. Adhere the layered image onto the card base using 3D Foam Squares
9. Add pearls as shown in the main photo

As I told you - it is so very easy - don't let layers fool you - they do not have to be complex - but they can certainly be beautiful when you use Spellbinders Dies.

Thank you for your comments and all of the support you give me - you make blogging such an amazing place to be!! Your encouragement is such a blessing for me - it makes my day! God bless you!
{{{Hugs}}} and happy crafting

Wednesday, November 18, 2015

Hip Hip Hooray

Hello Blog Friends - thank you for taking the time to visit - I hope you are inspired and feel at home.  I do appreciate all of your comments and encouragement - I know it takes time to comment and time is such a precious commodity these days.


I am sharing another whimsical card - this one was created using some images/ stickers I have had for what feels like forever - sent in RAKS from some very dear Sistahs.


The card base has been cut using the 5 x7 Matting Basics A Spellbinders® Nestabilities® Card Creator.  I have added the Pierced Stars Spellbinders® Celebra’tions™ Line by Richard Garay    - I am loving Stars at the moment - it may have something to do with our grandson and the 'boy' projects I have been creating,,,,


The sentiment is from SRM Stickers and the Washi Tape Chevron Print  is Spellbinders® Celebra’tions™ Line by Richard Garay.  Scrapbook Adhesives by 3L 3D Foam Squares and E-Z Runner have been used on this card.

This card is linked to the following:
Crafty Sentiment Designs - Anything Goes
Lemon Shortbread - Always Anything Goes
The Corrosive Challenges - Add a Sentiment
Retarte  Anything Goes
Artbymiran Challenge - Anything Goes
Not Just Cards Challenge - Anything Goes
Lawnscaping Challenge - In With The Old
Eureka Stamps Challenge - Anything Goes

Thank you for your comments and all of the support you give me - you make blogging such an amazing place to be!! Your encouragement is such a blessing for me - it makes my day! God bless you!
{{{Hugs}}} and happy creating!

Monday, November 16, 2015

International Ambassadors Unofficial Whimsical Woodland Blog Hop


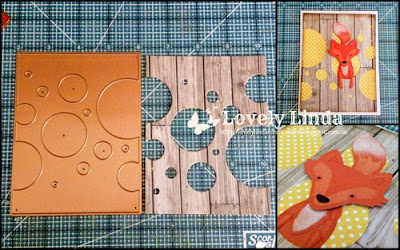
We so excited that you arjoining us on the International Ambassadors Unofficial Blog Hop - I hope you are enjoying them as much as we are and are finding a lot of inspiration - each of us has our own style and I am sure there is something to inspire everyone. This month we are sharing our projects with you - using the Woodland Collection - these whimsical Dies take adorable to the next level as you will see.


We love it that so many of you hop along with us - I hope you enjoy what we are sharing today!!


Spellbinders Products: 
Preferred Partner Products:
Other: Black Marker, Rust Cardstock; Green Cardstock; black permanent marker


1. Cut/emboss Woodland Fox using rust cardstock
2. Using the Die as a Stencil, sponge inside the open areas of the die using Electric Orange and Wedding Dress ink and a sponge dauber


3. Cut/emboss the paper using Confetti Plate
4. Adhere the fox through the holes as shown in the photo above, popping the head and the end of the tail up for dimension.
5. Trim off excess body
6. Adhere patterned paper behind the confetti plate using double sided tape


7. Layer into slightly larger white cardstock using double sided tape
8. Wrap green linen thread around the top of the card and tie a knot
9 Adhere to precut green card base
10 Cut/emboss sentiment from black cardstock and adhere to precut circle that has been trimmed
11 Adhere to card using 3D Foam Dots
12 Cut/emboss two (2) grass from the Mushrooms using green cardstock
13 Attach to the base of the card using 3D Foam Squares

hope you have enjoyed my tutorial, make sure you pop in and visit the other International Ambassadors - these girls are amazing - each one is picked to be an Ambassador for their country because they are seasoned designers and so inspiring, they also stand as talented designers in their own right - as you will see!!!  The list of International Ambassadors is below, in case you get lost along the way.

Christine Emberson - England
  Linda Lucas - Australia (you are here)
Yvonne van de Grijp - Netherlands

Thank you for your comments and all of the support you give me - you make blogging such an amazing place to be!! Your encouragement is such a blessing for me - it makes my day! God bless you!
{{{Hugs}}} and happy crafting

Sunday, November 15, 2015

Spellbinders Workshops

One of my roles as the Spellbinders International Ambassador for Australia is to teach and educate through demonstrations and Workshops at Craft Stores - both local and interstate.  This is a role I am proud of and love to do - firstly I get to use the most amazing products and secondly I get to meet and work with so many wonderful people...creative people are always so amazing and inspiring.


This weekend I visited Fantasia Scrapbooking and Stamps in Bella Vista, Sydney NSW.  Such a lovely large store and a pleasure to be in.  I have been visiting this particular store for a number of years.  Some of the ladies come to every Workshop without knowing what I am teaching - others are first timers.  The creativeness flows and each person adds their own 'flavour' to their projects - I love that - we can all be given the same products but it is not often we create 'works of the heart' that are the same.


I do like to get group photos and am always amazed at how many of the ladies disappear when the camera comes out - but these ladies were game - others - not so much! LOL!


I run two different Workshops one in the morning and another in the afternoon - with not a lot of time between,  The morning Workshop had a Nostalgic Christmas theme - using some of the new Holiday Dies.  The paper for these cards is from Kaisercraft.


The second Workshop was all about 'Shabby Chic' and we created 3 cards using a lot a big variety of  Dies.  I also use a variety of other products - Imagine Crafts ‘featuring’ Tsukineko; Scrapbook Adhesives by 3LWant2Scrap bling.  


The lovely owner of Fantasia - Julie and myself.


Looking for a Spellbinders Die - I believe you may find it here


Demonstrating Spellbinders Dies


Some of the ladies that have attended the Workshops.

If you would like a Workshop in your local Craft Store, please leave a comment for me here and we will go from there - imagine the fun we would have! 

Thank you for your comments and all of the support you give me - you make blogging such an amazing place to be!! Your encouragement is such a blessing for me - it makes my day! God bless you!
{{{Hugs}}} and happy crafting