}

Friday, October 30, 2015

Spellbinders Create a Woodland Scene Tutorial

I am happy to be sharing a Spellbinders Tutorial here on my Blog - using the fabulous Woodland Collection.  I could not choose between three Dies in this Collection - so I have used them all!


'Spellbinders® takes adorable to the next level with our new Woodland Collection. Let your imagination wander through a whimsical world with our new Woodland inspired shapes. Create a cute Woodland owl that can be used in so many creative ways. Perfect for Cards, Gifts, Parties, Scrapbook Pages, and More! - Spellbinders Blog

Spellbinders Products:


Preferred Partner Products:
Other: 
Patterned Paper; light brown, red and green cardstock; sanding block


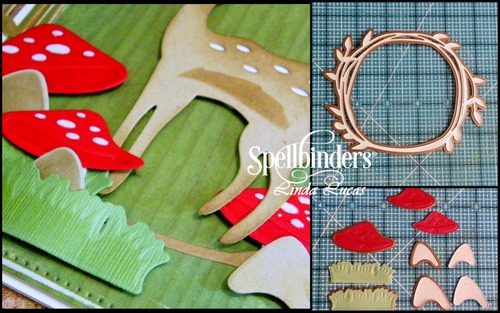
1. Cut/emboss one (1) Woodland Deer using light brown cardstock and the Platinum Die Cutting and Embossing Machine.
2. Use the Die as a stencil sponging the open areas using brown ink and a sponge dauber


3. Remove the Woodland Deer from the Die and add extra details
4. Adhere white cardstock behind the deer to create white spots


5. Cut/emboss one Pierced Rectangles #5 #6 (#1 being the smallest) using patterned paper
6. Lightly sand around the embossed edges using a sanding block


7. Cut emboss one (1) Wreath in light brown card, two (2) grass strips in green card,one (1) large Mushroom Top and two (2) small in red cardstock and one (1) large Mushroom base and two (2) small in kraft cardstock.
8. Adhere the Wreath to the center of the  layered card base
9. Colour embossed circles on mushroom tops using white gel pen, layer Mushrooms as shown in the photo above, using 3D Foam Squares.
10 Sponge grass while still in the Die using green ink and adhere to the base of the mushrooms using liquid glue on each end and a 3D Foam Square in the center to give added dimension.
11 Finish by adhering the Woodland Deer using 3D Foam Squares
NOTE: Use liquid glue on the feet of the deer as the mushrooms are already popped up.


Thank you for your comments and all of the support you give me - you make blogging such an amazing place to be!! Your encouragement is such a blessing for me - it makes my day! God bless you!
{{{Hugs}}} and happy creating!

Thursday, October 29, 2015

New Flourish Frame by Becca Feeken

Hello Blog Friends, if you know me at all, then you know I adore Becca Feeken as a Designer and artist - to say I am excited that she is now a Licensed Designer for Spellbinders would be an understatement - you seriously need to check out her new release Amazing Paper Grace - I just had to use one of them for today's card.


The Flourish Frame Set is divine -  I have used the actual Flourish Frame as my card base - cutting two using white cardstock and the Platinum Die Cutting and Embossing Machine.  The top of one Diecut has been scored at 2cm and folded forward and attached to scored Die cut to form the card base,  Ensure the pattern lines up.

The next filigree layer has been cut using teal cardstock and the Floral Assortment Spellbinders® Nestabilities® Decorative Elements.  The sides have been trimmed and the Die is layered onto the card base, followed by corrugated card trimmed slightly smaller using Scrapbook Adhesives by 3L E-Z Adhesive Runner. 

The circle frame has been cut from the Blooming Collection Spellbinders® Shapeabilities® Decorative Frames and adhered using liquid glue. The image is from Graphic 45.  A double seam binding bow has been adhered using liquid glue and the tag from the Flourish Frame has been sponged using the Die as a Stencil and stamped with a sentiment from the Penny Black Inc Tiny Wishes stamp set.


This card is linked to the following challenges:
Simon Says Challenge - Anything Goes
Clear It Out - White + 1 Color Stash: Anything Goes
Mod Squad Challenge - Bold and Beautiful
Bunny Zoe's Crafts - Shabby Chic
Craft-Dee BowZ - Anything Goes with a Handmade Bow
Creative Moments Challenge - Anything Goes
Stamps & Fun = Creativity - Blue & White
Crafty Gals Corner Challenge - Anything Goes
Amusing - Anything Goes
Sweet Stamps - Anything Goes
Alphabet Challenge - R is for Ribbon

Thank you for your comments and all of the support you give me - you make blogging such an amazing place to be!! Your encouragement is such a blessing for me - it makes my day! God bless you!
{{{Hugs}}} and happy creating!

Tuesday, October 27, 2015

HAPPY Birthday Collage

Hello Blog Friends - thank you to all of you who have been visiting my Blog - I hope you are inspired and enjoy your stay!  You know if it was in real life - there would be coffee involved! LOL!


Today I am sharing a collage card created using some of the things gathering on my desk - it is always fun to create with limited supplies - and for me, takes a lot of 'time' out of creating - stops the over thinking, which sometimes can be a hazard!


I have used precut patterned paper I was given in a very generous RAK and stamped it using a Stamp-It image.  I have used the Happy Holidays Sentiment and trimmed it to the one word, stamping the sentiment.  Washi tape, Want2Scrap bling and some flowers finish the card.   I have also used Scrapbook Adhesives by 3L Crafty Foam Tape and E-Z Adhesive Runner.


This card is linked to the following challenges:
Artistic Inspirations - Anything Goes with Twist of Birthdays
Simply Papercraft - Always Anything Goes
Star Stampz Challenge - Add A Sentiment
WordArt Wednesdays - Anything Goes
Amusing Challenge - Anything Goes
Use Your Stuff - Die Cuts and/or Punches
The Paper Nest Dolls Challenge - Always Anything Goes

Thank you for your comments and all of the support you give me - you make blogging such an amazing place to be!! Your encouragement is such a blessing for me - it makes my day! God bless you!
{{{Hugs}}} and happy creating!

Sunday, October 25, 2015

Birthday Wishes

Hello Blog Friends - I hope you are all enjoying a relaxing weekend - Sunday night has arrived too quickly - as always, but I am happy to say we have had a relaxing and productive weekend - how about you? Some of my time has been spent in The Studio and I love that...no surprises there!


I am always trying to steam-line what is on my desk - the best way to achieve it is to create cards with those things that are gather (well, it is my story and I am sticking to it! LOL!)  I have used the Royal Circle Spellbinders® Nestabilities® Decorative Elements and Fleur de Elegance Spellbinders® Nestabilities® Decorative Accents for my card - the Royal Circle has been used as a stencil before removing the cardstock from the Die - using Imagine Crafts ‘featuring’ Tsukineko Memento Ink in Teal Zeal.


My flower has been hand cut/fussy cut from some retired Stampin' Up! paper and popped onto seam binding as an embellishment.  The bling is from Want2Scrap.  Scrapbook Adhesives by 3L 3D Foam Squares and E-Z Runner have been used on this card. 

This card is linked to the following challenges:
Alphabet Challenge - R is for Ribbon
Simply Papercraft - Always Anything Goes
Graph'It Colour Challenge - Autumn / Christmas Colors*


Aud Sentiments Challenge - Birthday (+ a sentiment)
Crafting with an Attitude - Anything Goes 
Julia Spiri Challenge - Die Cuts and Punches
Star Stampz Challenge - Add A Sentiment

Thank you for your comments and all of the support you give me - you make blogging such an amazing place to be!! Your encouragement is such a blessing for me - it makes my day! God bless you!
{{{Hugs}}} and happy creating!

Saturday, October 24, 2015

Simply Said - You Mean the World to Me

Hello Blog friends - I  could not resist sharing another project I have created for you using another Die from the Spellbinders  Simply Said Collection.  If you missed yesterdays post you can see it HERE.


This wonderful You Mean The World Die does not need anything but the Die,cardstock,adhesive  and in this case a little patterned paper and ink.The intricate designs do all of the work and allow us to create an easy card with the WOW factor!  I have to add here - perfect for the 'dreaded man card' too.

I have cut/embossed the You Mean The World using the  Platinum™ Die Cutting and Embossing Machine. Before removing the cardstock from the Die the top part of the sentiment and the embossed frame have been sponged using a darker brown ink and Sponge Dauber - my daubers are kept 'fully loaded' so are quite a mixture of colours - loving the current shade!


A small scrap of paper from my stash has been adhered behind the world globe - believe it is a retired Basic Grey piece.  Blue cardstock has been added behind the 'world' sentiment.  A recycled map page has been adhered behind the Die cut and this has been popped up using 3D Foam Tape onto dark brown cardstock that has been cut slightly larger than the patterned layer.

It is as easy as that - I did tell you it was easy - didn't I!!  

This card is linked to the following challenges:

I am linking this to:
Artbymiran Challenge - Anything Goes
Brown Sugar – Anything Goes
Simply Papercraft - Always Anything Goes
Retarte  Anything Goes  
Not Just Cards - Always Anything Goes

Thank you for your comments and all of the support you give me - you make blogging such an amazing place to be!! Your encouragement is such a blessing for me - it makes my day! God bless you!
{{{Hugs}}} and happy creating!

Friday, October 23, 2015

Spellbinders Simply Wonderful Tutorial

I am excited to share a Spellbinders Step by Step Tutorial using one of the Simply Said Collection - it certainly lives up to it's name - this wonderful set of Dies does not need anything but the Die and cardstock and adhesive because it is so intricate - it is up to you if/ what, you add - I could not resist adding one little embellishment....


The Spellbinders Designers are showcasing these new Dies on the Spellbinders Blog - you can click HERE to see lots of inspiration.

Spellbinders Products:


Preferred Partner Products:
Other: 
Patterned Paper; Orange Button; Black Cardstock; 


1. Cut/emboss one (1) Simply Wonderful using Whirl White
2. Use Tool'N One to remove pieces from the Die Cut


3. Cut small piece of black cardstock  to the back of the word 'Wonderful'
4. Turn over and trim off any black cardstock that is showing.


5. Adhere the Simply Wonderful Die Cut to patterned paper using liquid adhesive - trimming off any excess patterned paper.
6. Pop up onto precut card base using crafty foam tape
7. Wrap twine around the front of the card twice and secure using an orange button, tying in a bow.
8. Adhere bling and you are finished

Didn't I tell you it was easy - if you are mass producing cards - these are the Dies for you!!

Thank you for your comments and all of the support you give me - you make blogging such an amazing place to be!! Your encouragement is such a blessing for me - it makes my day! God bless you!
{{{Hugs}}} and happy creating!

Tuesday, October 20, 2015

Bee Well Soon

Hello friends - I hope you have all had a good weekend and ready for the week ahead - for us in the Southern Hemisphere it is Monday and the latter part of the day,  Today's card is a Get Well card - it is always lovely to be thought of when you are not well and who can resist these darling bees.


I have used the Penny Black Inc. Sweet as Honey stamp set - this was designed by my dear friend Laura Kirste Campbell - I love working with her designs - they always 'speak to me'!  My card base has been cut using the A2 Curved Matting Basics A Spellbinders® Nestabilities® Card Creator and has been cut using the Grand Calibur Die Cutting and Embossing Machine.  The image has been stamped using  Imagine Crafts ‘featuring’ Tsukineko Memento Ink in Tuxedo Black.  Scrapbook Adhesives by 3L 3D Foam Squares and E-Z Runner have been used on this card. 


The Bee has been stamped twice and the wings of the second layer have been popped up on 3D Foam Squares,  I have coloured the images using Chameleon Art Pens and added a little shimmer to the wings.

This card is for the following challenges:
Sisterhood of Crafters - Die-lirious and Punchy
2 Creative Chicks - Anything Goes
Card and Scrap - Vintage or Shabby Chic
A-musing Challenge - Die Cuts
Jo's Scrap Shack Challenge - Anything Goes
Creative Fingers Challenge = Anything Goes
Hiding in My Craftroom Challenge - Favorite Cutting Tool (Spellbinders Grand Calibur Machine)
Speedy  Fox and Friends - round the corners 
Simply Papercraft Challenge - Anything Goes
Polka Doodle Challenge - Use a die cut
Crafty Catz Challenge - Anything Goes

Thank you for your comments and all of the support you give me - you make blogging such an amazing place to be!! Your encouragement is such a blessing for me - it makes my day! God bless you!
{{{Hugs}}} and happy creating!

Sunday, October 18, 2015

Coffee Time

Hello Blog Friends - I hope you are having a lovely weekend and manage to get some relaxing in somewhere.  Once again it is Sunday night here - they seem to come around very quickly - I think the weekend goes a lot faster than any other days in the week - don't you!?!  We have had family here from Interstate and that has been wonderful - too quick but wonderful!

.

One of my favourite ways of relaxing is having a coffee - whether it be in a cafe with friends or at home alone in the Studio - I enjoy every sip and could not resist making this card monochromatic - almost coffee tones! 

I have cut/embossed the Delicate Doilies Spellbinders® Shapeabilities® #5 and #6 (#1 being the smallest) using white card stock and the Grand Calibur Die Cutting and Embossing Machine.
  The image and sentiment are from Coffee Time Spellbinders® Celebra’tions™ Line by Richard Garay. They have been stamped using Imagine Crafts ‘featuring’ Tsukineko Versafine in Sepia.
and popped up using  Scrapbook Adhesives by 3L 3D Foam Squares.  

This card is linked to the following challenges:
Hiding in my Craft Room  - favourite cutting tool  (Spellbinders Grand Calibur)
Speedy  Fox and Friends - round the corners 
Artbymiran Challenge - Anything Goes
Crafty Catz - Anything Goes
Simply Papercraft - Always Anything Goes
As You Like it Challenge -  Monochrome or Colour (& Why) -the monotone colour suits the these of the stamps
Crafty Girls Creations - Always Anything Goes
Star Stampz Challenge - Add A Sentiment
WordArt Wednesdays - Anything Goes

Thank you for your comments and all of the support you give me - you make blogging such an amazing place to be!! Your encouragement is such a blessing for me - it makes my day! God bless you!
{{{Hugs}}} and happy creating!

Thursday, October 15, 2015

International Ambassadors Unofficial 'Let's Party' Blog Hop

Welcome to the 10th  International Ambassadors Unofficial Blog Hop - I hope you are enjoying them as much as we are and are finding a lot of inspiration.  The International Ambassadors love to get together and create - if only it was in real life!!! This month we are sharing our Let's Party projects with you - using the Let's Party collection - and love it that so many of you hop along with us - I hope you enjoy what we are sharing today!!


Spellbinders Products:

Preferred Partner Products:
Other: 
 Sanding Block, Patterned Paper; 


1. Cut/emboss Cake Inset, Cake, and Cake Stand using Whirl White and the Grand Calibur Due Cutting and Embossing Machine.
2. Before removing the Cake Stand from the Die, use the Die as a Stencil, sponging around the inside edges using Delicata in Golden Glitz.
3. Adhere the 'icing' to the cake using
4. Cut and emboss All About Cake Inset and Cake Dies from patterned paper, Adhere as shown.

5. Cut/emboss one Gift of Happiness using Whirl White cardstock
6. Fold at scored lines using Mountain and Valley folds,

7. Cut/Emboss Rectangle using patterned paper and adhere using double sided tape.
8. Cut three steps - slightly smaller than the card base, adhere using double sided tape.

9. Adhere cake to left panel of the card using liquid glue; popping icing up using 3D Foam Squares
10 Adhere 3 Mulberry Paper Roses using liquid glue.
11 Cut/emboss Heart #1 and #2 using pink card stock, layer and adhere to the back step of the card
12 Cut/Emboss one Labels Thirty-Nine #1 (#1 being the smallest) using Whirl White
13 Use the Die as a Stencil and sponge using Petal Pink inside the Die
14. Stamp sentiment in black ink and adhere, tucking under the #1 heart
15. Cut/emboss one Mini Envelope Two, using the Intricate Cuts insert. 
16. Create envelope and add embellishment - eg. left over Die Pieces.
17 Adhere the ribbon across the lower portion of the card, followed buy pearl flower braid, using liquid glue.

hope you have enjoyed my tutorial, make sure you pop in and visit the other International Ambassadors - these girls are amazing - each one is picked to be an Ambassador for their country because they are seasoned designers and so inspiring, they also stand as talented designers in their own right - as you will see!!!  The list of International Ambassadors is below, in case you get lost along the way.

Yvonne van de Grijp - Netherlands
Christine Emberson - England
  Linda Lucas - Australia (you are here)

Thank you for your comments and all of the support you give me - you make blogging such an amazing place to be!! Your encouragement is such a blessing for me - it makes my day! God bless you!
{{{Hugs}}}