}

Saturday, June 27, 2015

Spellbinders Handle with Care Tutorial

Hello Blog Friends - I am sharing a Spellbinders Tutorial and am on a scrapbooking run.  I love how the Spellbinders Dies work with any art form - as you can see in this tutorial...they make scrapbooking so easy and add extra points of interest.  I am creating a Baby Album of my grandson, so you can expect to see more layouts from time to time.


Spellbinders Products:
Cross Promotional Partners:
Other: 2 6x4 photos; Sanding Block; Stickles; Buttons; Lace flowers; Butterfly Stencil; White Pen; Patterned paper 12x12; scraps of patterned paper


1. Cut both photos using Labels Forty-Six #6 (#1 being the smallest)
2. Cut/emboss two Labels Forty-Six Decorative Elements using #2 #3 Dies (#1 being the smallest)
3. Put decorative insert aside and adhere the patterned frame over the photos using liquid glue.
4. Adhere sentiment sticker using 3D Foam Squares
5. Adhere the photos to the patterned paper using Crafty Foam Tape


6. Cut/emboss two Labels Forty-Six #2 (#1 being the smallest) in patterned paper
7. Cut/emboss two (2) Les Papillions Butterflies - both the base and coordinating butterfly using cream cardstock
8. Adhere the filigree layer to the base butterfly using liquid glue
9. Sponge using Teal Zeal and a Sponge Dauber - lightly add Stickles
10 Adhere silver rhinestone to the body of the butterfly
11 Attach the layered butterfly to the Labels Forty-Six #2 using liquid glue
12 Attach 'random' left over strips of white embossed card to the top right and bottom left corner
13 Adhere the Labels Forty Six #2 and butterfly to the centre of each - on an angle
14 Attach Swirls Finesse - White Pearls as shown in the main photo


14. Cut/emboss the sentiment from the Story of Us and About Us using aqua cardstock
15. Adhere the sentiment to the layout as per the main photo
16 Attach lace flowers using liquid glue, followed by a small button in the centre of each


17 Adhere 3 buttons to the top left corner and bottom right corner using liquid glue
18 Stencil butterflies randomly onto layout using Teal Zeal and a Sponge Dauber
19 Using White Gel pen add spots to butterflies


Thank you for your comments and all of the support you give me - you make blogging such an amazing place to be!! Your encouragement is such a blessing for me - it makes my day! God bless you!

{{{Hugs}}} and happy crafting!!

Wednesday, June 24, 2015

Penny Black - Spread Sunshine

Hello Blog Friends - it has been a few days since I have posted anything - time is just flying by since the arrival of our adorable grandson 8 weeks ago - and then there is kit cutting for the Spellbinders Workshops I have happening in July!


   In the meantime, my card today has been created using a Penny Black Inc image and faux water colouring technique - don't you just love that effect!  I have also used Imagine Crafts 'featuring' TsukinekoMemento Ink in Tangelo, Bamboo Leaves, Pear Tart and Tuxedo Black.  The Dies are Spellbinders Labels Forty Nestabilities.  I have also used Washi Tape, a vintage button and Scrapbook Adhesives by 3L:  E-Z Adhesive Runner and 3D Foam Tape.

This card is linked to the following challenges:
Cuttlebug Mania - Use a Sentiment 
Card Mania -  Metal Embellishment (Button)
Not Just Cards - Always Anything Goes
Great Impressions - June - Anything Goes
Simply Papercraft - Anything Goes
Loves Rubber Stamps  -  Use a Die Cut
Sister Act Card Challenge - Always Anything Goes (Cards only)
STAMPlorations Challenge Blog June - Stamps & Washi

Thank you for your comments and all of the support you give me - you make blogging such an amazing place to be!! Your encouragement is such a blessing for me - it makes my day! God bless you!
{{{Hugs}}} and happy crafting!!

Sunday, June 21, 2015

Artist in Residence - Father Day Card Tutorial

I have an Artist in Residence Tutorial on the Imagine Crafts Blog - The theme is Father's Day - Although in the Southern Hemisphere we don't celebrate Father's Day until later in the year, it is always a pleasure to celebrate the Fathers, Father-in-Law's, Father figures in people's lives.  I hope you are inspired by this Tutorial.


You can see the whole project and details by clicking HERE.  I would love you to pop over there and leave me a comment letting me know what you think - you know I love to see you!

Thank you for your comments and all of the support you give me - you make blogging such an amazing place to be!! Your encouragement is such a blessing for me - it makes my day! God bless you!

{{{Hugs}}} and happy creating!


Saturday, June 20, 2015

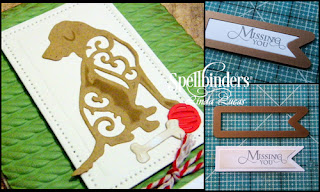
Spellbinders Dog-Gone It Missing You Tutorial

I have a Spellbinders Tutorial on my Blog today - sharing a card using the adorable Dog Days Die - it can be used for so many occasions!   


Spellbinders Products:
Cross Promotional Partners:

Other: Red, White and Kraft cardstock; scissors; sentiment from my stash; paw brads, red/white twine; dogbone brad

1. Cut/emboss Dog Days #3 (# 1 being the smallest) using Kraft cardstock. 
2. Cut/emboss one bone #2 using white cardstock and;
3. Cut/emboss one ball #1 using red cardstock


4. Emboss green cardstock using Need a Rope 3-D Em-bossing Fold'er
NOTE:  The sandwich for Spellbinders 3-D Em-bossing Fold'ers in Spellbinders Grand Calibur® Die Cutting and Embossing Machine (stack from bottom up): B-Pink Embossing Plate, 3-D Em-bossing Fold'er with Media Inside and D-Raspberry Adapter Plate.
5. Pop up onto the card base using Crafty Foam Tape
6. Cut/emboss one (1) Pierced Rectangles #1 #2 (#1 being the smallest) using white cardstock, placing #1 Die inside the #2 die and secure using masking tape.


7. Adhere the Dog Days to the Pierced Rectangle using Liquid Glue
8. Pop up onto the upper portion of the layered card base
7. Stamp sentiment using Espresso Truffle
8. Cut/emboss using Petite Pennants Ribbon Tail #1 (#1 being the smallest)
9. Tie Twine around the card front twice and secure with a knot
10 Add Bone Brad to the left side of the sentiment tag
11 Adhere the sentiment to the lower portion of the card using crafty foam tape

Thank you for your comments and all of the support you give me - you make blogging such an amazing place to be!! Your encouragement is such a blessing for me - it makes my day! God bless you!

{{{Hugs}}} and happy crafting!!

Thursday, June 18, 2015

Mixed Media Canvas - Life is Art

Hello Blog Friends - I hope you are all well.  Today I am sharing a Mixed Media Canvas that I created while at the Spellbinders Designers Retreat in Phoenix last year.  This was a great highlight for me personally, as Stacey Caron was teaching for this session and sharing her passion with us - she is amazing and so inspiring.


We used so many different products and techniques - including using the Die as a Stencil while adding texture paste and lots of colour.  


I just loved running the Bottle Tops through the Grand Calibur Die Cutting and Embossing Machine - such a great effect - I could not help doing more and more - a little bit addictive for sure!


I could not resist adding some of the gorgeous Want2Scrap Corner Bling - that is one of the great things about Mixed Media - there is no right or wrong - how cool is that!?  I used one of the Les Papillion 2 Shapeabilities® as a Stencil for the butterfly and then applied pink ink.


This sentiment just seemed to fit perfectly - a few sequins and some Imagine Crafts 'featuring' Tsukineko Pico Embellisher in Wedding Dress on the Spellbinders flowers.


Thank you for your comments and all of the support you give me - you make blogging such an amazing place to be!! Your encouragement is such a blessing for me - it makes my day! God bless you!

{{{Hugs}}}

Monday, June 15, 2015

International Ambassadors Unofficial Victorian Garden Blog Hop

Welcome to the  International Ambassadors Unofficial Victorian Garden Blog Hop! As you have have caught on the International Ambassadors are getting together to 'play' with Spellbinders Dies every month and it comes around so quickly - this Blog Hop is purely for fun and inspiration, totally unofficial and an opportunity for you to get top know us (and our styles) more.


This month we are using the gorgeous Victorian Garden Dies - I love this range and am sure you do/will too!

Spellbinders Products:
Cross Promotional Partners:

Other:  Flower embellishments; Flocked Wallpaper; Vintage Lace; pink cardstock


1. Cut/emboss two (2) Labels Forty-Seven in pink cardstock
2. Score one (1) pink Die Cut at 1.5 cm and fold forward
3. Attach double sided tape to the scored portion
4. Line up the second cream card and adhere - making sure to line up the edges


5. Cut/emboss one (1) Decorative Fancy Diamond #3 (#1 being the smallest) in white cardstock
6. Use the Die as a stencil and sponge around the edges using Desert Sand and a Sponge Dauber
7. Cut/emboss one (1)Fancy Diamond #5 (#1 being the smallest) in  recycled wallpaper


8. Layer the Decorative Fancy Diamond Die onto the card base using 3D Foam Squares
9. Layer the Fancy Diamond onto the layered Base.
10 Cut/emboss one Decorative Fancy Diamond #1 (#1 being the smallest) using pink cardstock
11 Cut/emboss one Fancy Diamond #1 (#1 being the smallest) in white cardstock
12  Use the Die as a stencil and sponge around the edges using Desert Sand and a Sponge Dauber
13 Adhere the Dies to the card base using 3D Foam Squares as shown above
14 Attach lace around the center of the layered card using liquid glue
15 Adhere paper rose using liquid glue
16 Add pink pearls along the lace as shown in the main photo.


I have used:


hope you have enjoyed my tutorial, make sure you pop in and visit the other International Ambassadors - these girls are amazing - each one is picked to be an Ambassador for their country because they are seasoned designers and so inspiring!!  The list of International Ambassadors is below, in case you get lost along the way.

Linda Lucas (you are here)
Thank you for your comments and all of the support you give me - you make blogging such an amazing place to be!! Your encouragement is such a blessing for me - it makes my day! God bless you!

{{{Hugs}}}

Sunday, June 14, 2015

Artist in Residence - All about Weddings Tutorial

I have an Artist in Residence Tutorial on the Imagine Crafts Blog - The theme is all about Weddings - don't we love to go to a wedding - I am sharing a tutorial for a nostalgic card - perfect for this occasion.


You can see the whole project and details by clicking HERE.  I would love you to pop over there and leave me a comment letting me know what you think - you know I love to see you!

Thank you for your comments and all of the support you give me - you make blogging such an amazing place to be!! Your encouragement is such a blessing for me - it makes my day! God bless you!

{{{Hugs}}} and happy creating!


Friday, June 12, 2015

Spellbinders Out on a Limb Tutorial

For today's Spellbinders Tutorial I am sharing a layout and have the most adorable subject - our new (and first) grandson, Noah!  I love to scrapbook, but time does not allow me to do as much as I would like - therefore it is imperative that I am able to get the look I am wanting and not take hours - which I tend to do. 


 As you will see from this Tutorial - Spellbinders Dies certainly make it easier....

Spellbinders Supplies:

Cross Promotional Partners:

Other: 2 Two 6" x 4" photos; Authentique Paper; Pale yellow, light green and light brown cardstock, 


1. Cut/emboss two (2) Out on a Limb Branch Die using light brown cardstock
2. Remove from Die and lightly sand using Sanding Book
3. Cut/emboss Leaves #1 #2 #3 (#1 being the smallest) using light green cardstock as many times as desired
4. Cut/emboss bird #4 #5 (#1 being the smallest)  Dies using pale yellow cardstock

5. Cut/emboss sign #7 (#1 being the smallest) using white cardstock
6. Adhere sentiment sticker
7. Pop up onto brown sign using 3D Foam Squares
8. Add Baby Bling to each corner

9. Cut/emboss the photos using 5x7 Matting Basics B #6 (#1 being the smallest)
10 Remove from Die and lightly sand using Sanding Boo
11 Cut DCWV cardstock  
12 Layer each photo onto DCWV using double sided tape
13 Adhere embellishments as desired
14 Adhere Out on a Link to top left corner and lower right corner using liquid glue
15 Adhere 1 large and 1 small bird above both sets of branches

16 Attach one (1) Fun Filled Ring on corners of the photos as shown
17 Adhere sentiment embellishments as shown

As you can see - scrapbooking does not have to be complicated to look good!  This layout was simple - with the help of a few Spellbinders Die sets!  I hope you are inspired to use your Dies on your projects - we are only limited by our imagination!

Thank you for your comments and all of the support you give me - you make blogging such an amazing place to be!! Your encouragement is such a blessing for me - it makes my day! God bless you!

{{{Hugs}}}

Spellbinders Resplendent Roses Tutorial

Hello Spellbinders fans, I am sharing a Step by Step Tutorial on the Spellbinders Blog using the divine Roses and Thorns Shapeabilities®. If you are a rose lover like me, you will LOVE the possibilities with these divine dies...


I would love you to pop over and check it out - and leave me a comment while you are there - letting me know what you think! You can see the Step by Step Tutorial HERE

Thank you for your comments and all of the support you give me - you make blogging such an amazing place to be!! Your encouragement is such a blessing for me - it makes my day! God bless you!
{{{Hugs}}}


Follow on Bloglovin


Tuesday, June 9, 2015

Thankful Everyday Layout

Hello Blog Friends, today I am sharing a layout I created a little while ago - scrapbooking is something I love to do, but there never seems to be enough time in the day for me - I am sure I am not alone with this!


This family photo was taken at Christmas - it is so hard to get a photo with everyone in it these days - now our family has grown by one - our first grandchild, Noah was born in April and I am going to have to try to get an updated family photo - don't hold your breath! LOL!


The gorgeous background paper is from the Kaisercraft Kaleidoscope collection - I am loving the colours and all that it has got happening on it, without taking over.  This collection not only has gorgeous paper but also it's own stickers and embellishments - it makes it all so easy to coordinate!  Don't you love those little banners.  The buttons are recycled from my Great Grandmother's button tin - I try to use them on projects that are personal and precious to me - this layout is one of them! 


I love to use Spellbinders Dies on my layouts, they add such a great touch - this one is the Fleur de Elegance Nestabilities® Decorative Accents - a favourite with me.  It has been cut using the  Grand Calibur Die Cutting and Embossing Machine and layered to frame opposite corners of the photo and the patterned paper.


I have cut the sentiment into individual words and layered each word onto white cardstock to make it 'pop'...


Some flowers from my stash are added at the top of the photo along with sentiments from the Kaleidoscope Collection down the side. I have used  Scrapbook Adhesives by 3L E-Z Adhesive Runner and 3D Foam.


This layout is linked to the following:
2 Creative Chicks - Anything Goes (no cards)
Always Something Creative - Anything Goes
Card and Scrap - Use Dies
Challenge YOUrself -19 Anything Goes - Layouts only
Crafts Galore Encore - Anything Goes
Ladybug Crafts - Use Your Dies
Our Creative Corner - What Makes You Smile
Paper Creator's Crafts - Anything Goes
Recycle, Re-Purpose & Re-Invent - Always Anything Goes but must Recycle
The Sisters of Craft - Anything Goes
Your Scrapbook Place - Anything Goes 
Not Just Cards - Always Anything Goes
Use Your Stuff - Sentiment
We Love 2 Create  - Anything Creative / Mixed Media Goes
Thank you for your comments and all of the support you give me - you make blogging such an amazing place to be!! Your encouragement is such a blessing for me - it makes my day! God bless you!

{{{Hugs}}}
Follow on Bloglovin